How I Created Apple’s Shortcuts Icon System
A step-by-step guide on implementing Apple’s Shortcuts Icons Customization system.


Introduction
In this tutorial, I will share with you how I created the icon-creating system that I see in a lot of apps and I really liked what Apple did in their Shortcuts app. I have been wondering how do they create such a thing… how you can customize an icon for a list and not just choose an already finished icon.
 Creating Icons
Of course, what I did is that I googled a lot but I didn’t go anywhere. Therefore, I decided to make my own!
Note: I know that my approach is far away from perfect and, of course, I can improve it a lot better. So, please if you know a better approach share it with me.
In this article, we will go through:
The starter project
Describing my approach
Adding CoreDataCreating a CoreData Manager model
Rely on the CoreData model
Implement CreateListController
Implement ListIconController
Updating the main ViewController
The final result and a Conclusion
Resources
The Starter Project
Previously I tried to create custom collectionView like Apple’s Shortcuts app. Then I wrote an article about it and you can read it here.
Pull the repo from GitHub and let’s start. HassanElDesouky/ShortcutsCollectionView github.com
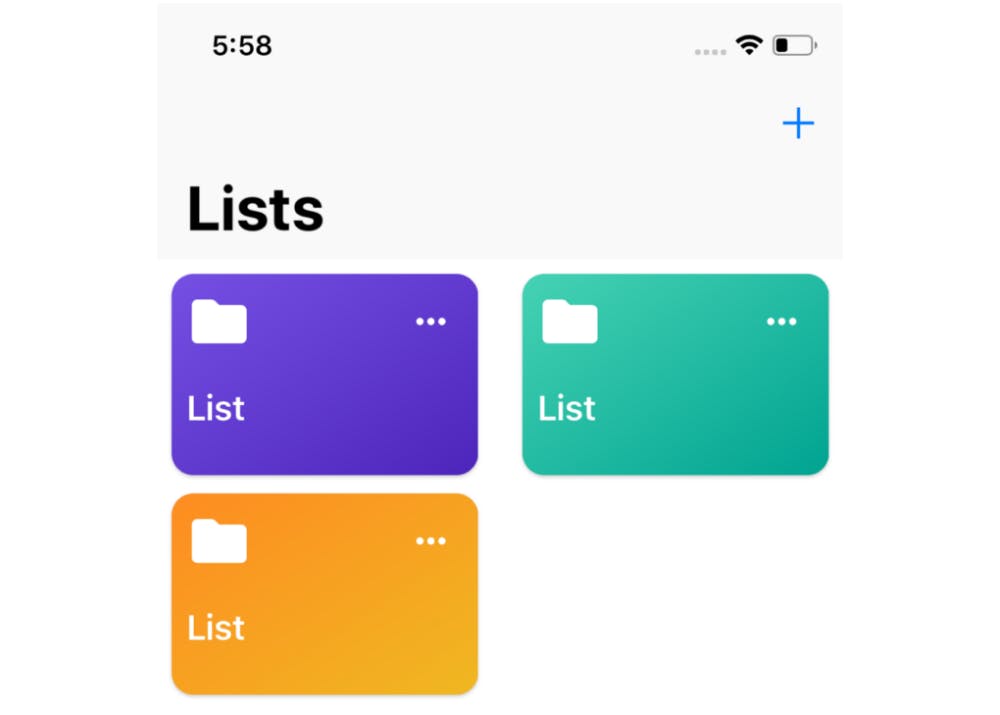
Run the project in Xcode and you will be starting with something like this.
My approach
In order to achieve what I was looking for I manly relyed on Notification Pattern to pass through the selected icons and colors.
From passing through the icons and background colors I concatenated a view from that info and then rendered the UIView to a UIImage.
I also used CoreData to store all of the information about the List.

CoreData
I was learning CoreData so I choose to use it as the database for my app as it’s really easy to use and to add in your existing projects.
From File choose New File *or by using the keyboard ⌘+N, then choose Data Model under the Core Data tab. Name it Model and click Create*.
Add a new Entity let’s call it List then I’ll add a few attributes:
nameof type StringfirstColorof type Binary DatasecondColorof type Binary DataimageDataof type Binary Data and in the attributes inspector check on Allows External Storage
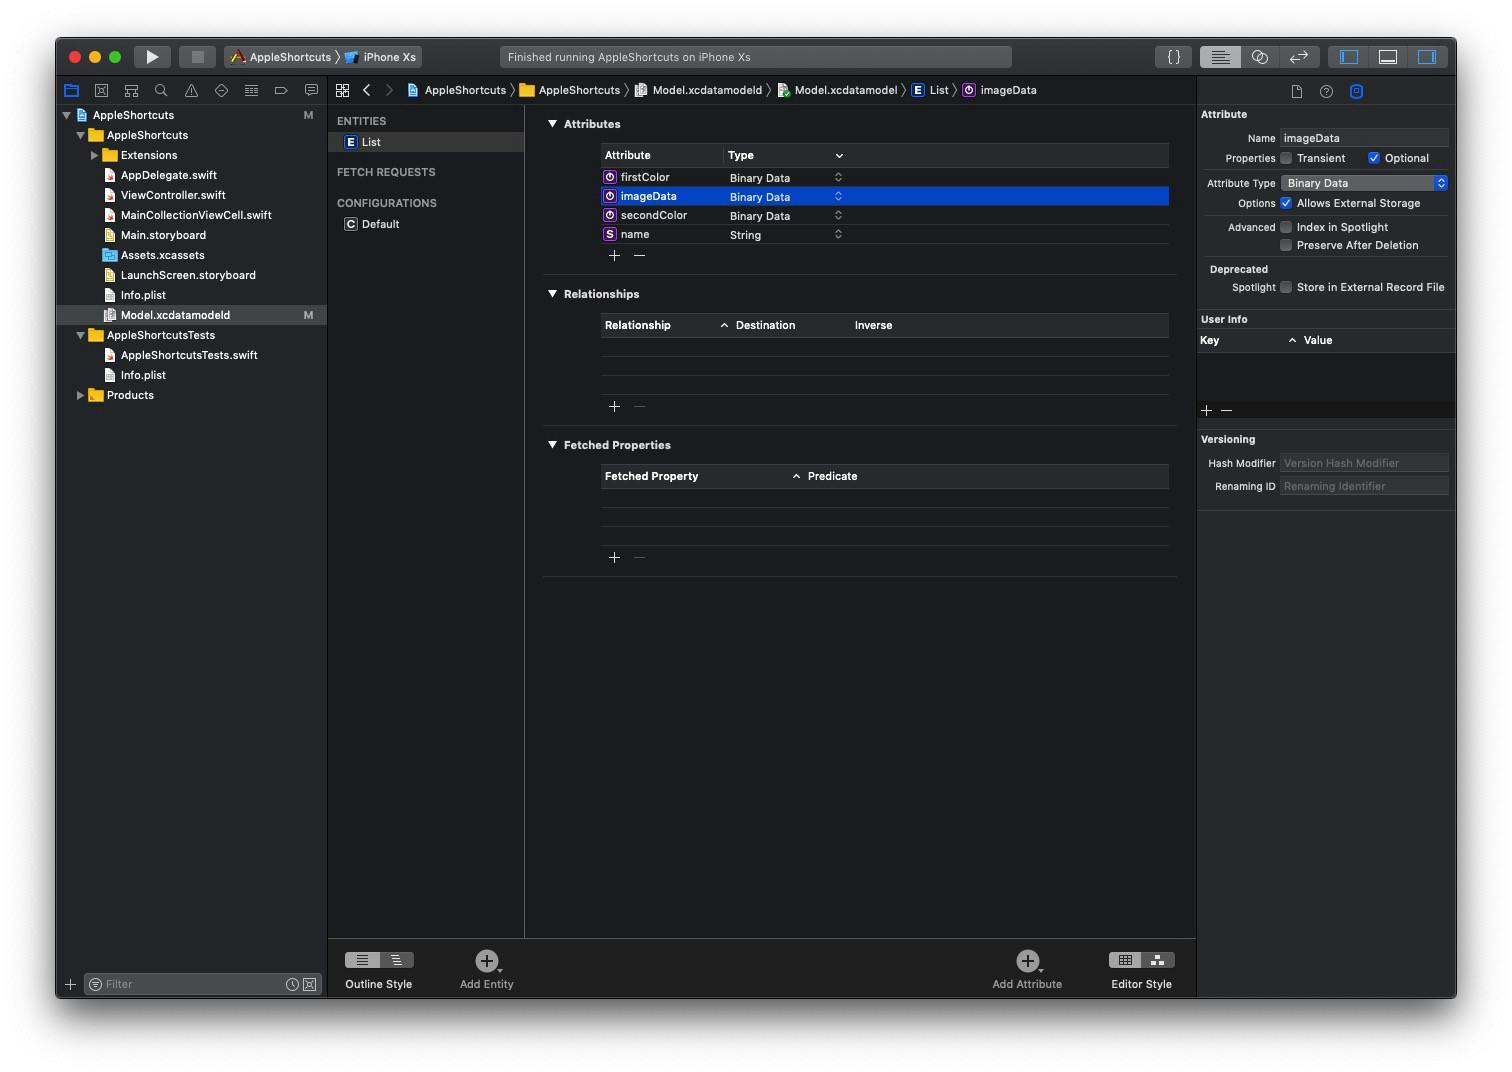 The CoreData model with the List entity and its attributes
CoreData Manager
To make things easy I’ll make a CoreDataManager struct to deal with CoreData easier.
From File choose New File *or by using the keyboard ⌘+N, then choose Swift File. Name it CoreDataManager and click Create.*
struct CoreDataManager {
  static let shared = CoreDataManager()

  let persistentContainer: NSPersistentContainer = {
    let perCon = NSPersistentContainer(name: "Model")
    perCon.loadPersistentStores { (storeDescription, err) in
      if let err = err {
        fatalError("\(err)")
      }
    }
    return perCon
  }()

  func fetchLists() -> [List] {
    let context = persistentContainer.viewContext
    let fetchRequest = NSFetchRequest<List>(entityName: "List")
    do {
      let lists = try context.fetch(fetchRequest)
      return lists
    } catch let err {
      print("\(err)")
      return []
    }
  }
}
By the help of this model, I can get the contextof the CoreData, get all of the lists.
Rely on CoreData
We will need to make some changes in order to fully rely on CoreData. Go to ViewController.swift and add a new Property:
**var** lists = [List]()
In collectionView:numberOfItemsInSection: method change return statement from 3to lists.count.
Then, go to MainCollectionViewCell.swift and add a list Property, remove the gradients methods so the setup method will match the following.
  // MARK: Setup Cell
  fileprivate func setupCell() {
    setCellShadow()
    self.addSubview(iconImageView)
    self.addSubview(listNameLabel)
    self.addSubview(editButton)
    iconImageView.anchor(top: safeTopAnchor, left: safeLeftAnchor, bottom: nil, right: nil, paddingTop: 8, paddingLeft: 8, paddingBottom: 0, paddingRight: 0, width: 36, height: 36)
    listNameLabel.anchor(top: iconImageView.bottomAnchor, left: safeLeftAnchor, bottom: nil, right: nil, paddingTop: 18, paddingLeft: 8, paddingBottom: 0, paddingRight: 0)
    editButton.anchor(top: safeTopAnchor, left: nil, bottom: nil, right: safeRightAnchor, paddingTop: 8, paddingLeft: 0, paddingBottom: 0, paddingRight: 8, width: 36, height: 36)
  }
 }
Go back to ViewController.swift and in collectionView:cellForItemAt: method update it; to just pass the list.
  override func collectionView(_ collectionView: UICollectionView, cellForItemAt indexPath: IndexPath) -> UICollectionViewCell {
    let cell = collectionView.dequeueReusableCell(withReuseIdentifier: cellId, for: indexPath) as! MainCollectionViewCell
    let list = lists[indexPath.row]
    cell.listNameLabel.text = list.name
    cell.setGradientBackgroundColor(colorOne: UIColor.color(data: list.firstColor!)!, colorTow: UIColor.color(data: list.secondColor!)!)
    cell.editButton.addTarget(self, action: #selector(editCellButton), for: .touchUpInside)
    cell.makeRoundedCorners(by: 16)
    if let image = list.imageData {
      cell.iconImageView.image = UIImage(data: image)
    }
    return cell
  }
Now after we defined the data source for our lists, let’s move to actually create a new list.
Create a List
I will create a new Storyboard. So again from File choose New File *or by using the keyboard ⌘+N, then choose Storyboard I will name it CreateList then click create.*
Add a TableViewController with the following attributes static cells and grouped then in the first and the only section make them 2 rows. In the first row add a TextField and in the second row and a Label and an ImageView, and change its accessory to Disclosure Indicator.
Add a NavigationItem and both a LeftBarButton and a RightBarButton.
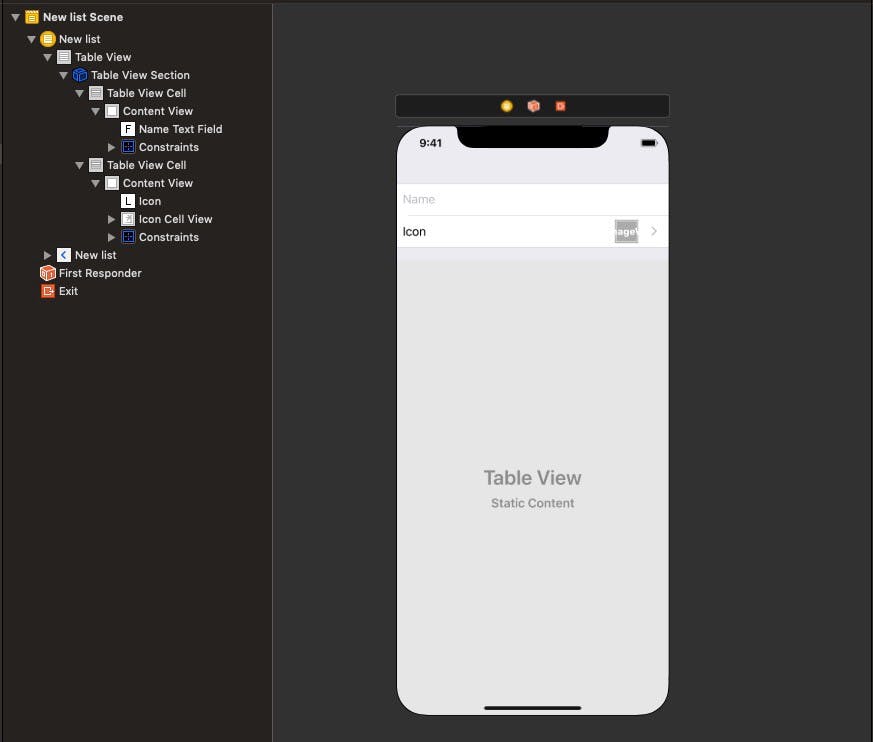
Create a new Swift File let’s call it CreateListController and make it inherits from UITableViewController.Then go again to the storyboard and set the custom class and the Storyboard ID to CreateListController.
For testing purposes, go to ViewController.swift and in addNewList method push our new controller. You will see that the new controller is pushed but of course, nothing is working yet.
Create a protocolcall it CreateListControllerDelegate.
protocol CreateListControllerDelegate: class {
  func didAddList(list: List)
}
Create outlets for the bar button item, text field, and icon image view. Also, create actions for both bar button items, and create the delegate property.
class CreateListController: UITableViewController {

  @IBOutlet weak var doneBarButton: UIBarButtonItem!
  @IBOutlet weak var nameTextField: UITextField!
  lazy var iconImage: UIImageView = {
    let imgView = UIImageView()
    return imgView
  }()
  @IBOutlet weak var iconCellView: UIImageView!

  weak var delegate: CreateListControllerDelegate?
  // ..
  // ..

  override func viewDidLoad() {
    super.viewDidLoad()
    //..
  }

  override func viewWillAppear(_ animated: Bool) {
    super.viewWillAppear(animated)
    //..
  }

  @IBAction func handleSave(_ sender: Any) {
    // Create List
  }

  @IBAction func handleCancel(_ sender: Any) {
    // Dismiss
  }
}
Connect the delegate in addNewList method inside of ViewController.swift file.
  @objc func addNewList() {
    let storyboard = UIStoryboard(name: "CreateList", bundle: nil)
    guard let createListController = storyboard.instantiateViewController(withIdentifier: "CreateListController") as? CreateListController else { return }
    createListController.delegate = self // delegate connected
    let vc = UINavigationController(rootViewController: createListController)
    present(vc, animated: true, completion: nil)
  }
Then handle empty fields like if the text field is empty the done bar button should be disabled.
class CreateListController: UITableViewController {
    @IBOutlet weak var doneBarButton: UIBarButtonItem!
    @IBOutlet weak var nameTextField: UITextField!
    // ..
    // ..
    var chooseIconTapped = false

    override func viewDidLoad() {
      super.viewDidLoad()
      handleEmptyFields()
    }

    override func viewWillAppear(_ animated: Bool) {
      super.viewWillAppear(animated)
      checkFields()
    }

    func handleEmptyFields() {
      doneBarButton.isEnabled = false
      nameTextField.delegate = self
    }

    func checkFields() {
      if list != nil || chooseIconTapped && nameTextField.text!.count > 0 {
        doneBarButton.isEnabled = true
      }
    }
}

extension CreateListController: UITextFieldDelegate {
  func textField(_ textField: UITextField, shouldChangeCharactersIn range: NSRange, replacementString string: String) -> Bool {
    let text = (nameTextField.text! as NSString).replacingCharacters(in: range, with: string)
    if text.isEmpty || !chooseIconTapped {
      doneBarButton.isEnabled = false
    } else {
      doneBarButton.isEnabled = true
    }
    return true
  }
}
Then, of course, to save all of the changes you would have to implement creating a new list and storing it in CoreData.
  private func createList() {
    let context = CoreDataManager.shared.persistentContainer.viewContext
    let list = NSEntityDescription.insertNewObject(forEntityName: "List", into: context)
    list.setValue(nameTextField.text, forKey: "name")
    if let firstColor = firstColorData {
      list.setValue(firstColor, forKey: "firstColor")
    }
    if let secondColor = secondColorData {
      list.setValue(secondColor, forKey: "secondColor")
    }
    if let image = iconImage.image {
      let imageData = image.jpegData(compressionQuality: 0.8)
      list.setValue(imageData, forKey: "imageData")
      iconCellView.image = UIImage(data: imageData!)
    }
    do {
      try context.save()
      dismiss(animated: true) {
        self.delegate?.didAddList(list: list as! List)
      }
    } catch {
      let nserror = error as NSError
      fatalError("Unresolved error \(nserror), \(nserror.userInfo)")
    }
  }
Create icon controller
If you took a look at the original Shortcuts app in the icon creating screen. You will see that.

IconView: you will construct the icon and see your result in that view. SegmentedControl: you will use the segmented control to switch between the views in the container view. ContainerView: in this view, you will select your desired color, glyph, or choose an image.
Therefore, I created a similar screen in the CreateList.storyboard.

Create four new Swift files name them ListIconController, IconColorController, IconGlyphController, and IconOtherController.
In IconOtherController
You will need to handle selecting a photo and passing the photo using Notifications to the ListIconController.
class IconOtherController: UIViewController {
  override func viewDidLoad() {
    super.viewDidLoad()
  }

  @IBAction func handleSelectPhoto(_ sender: Any) {
    let imagePC = UIImagePickerController()
    imagePC.delegate = self
    imagePC.allowsEditing = true
    present(imagePC, animated: true, completion: nil)
  }
}

extension IconOtherController: UIImagePickerControllerDelegate, UINavigationControllerDelegate {
  func imagePickerController(_ picker: UIImagePickerController, didFinishPickingMediaWithInfo info: [UIImagePickerController.InfoKey : Any]) {
    if let edditedImage = info[UIImagePickerController.InfoKey.editedImage] as? UIImage {
      let iconDict: [String: UIImage] = ["iconDict": edditedImage]
      NotificationCenter.default.post(name: Notification.Name(rawValue: "iconImage"), object: nil, userInfo: iconDict)
    }
    if let originalImage = info[UIImagePickerController.InfoKey.originalImage] as? UIImage {
      let iconDict: [String: UIImage] = ["iconDict": originalImage]
      NotificationCenter.default.post(name: Notification.Name(rawValue: "iconImage"), object: nil, userInfo: iconDict)
    }
    dismiss(animated: true, completion: nil)
  }

  func imagePickerControllerDidCancel(_ picker: UIImagePickerController) {
    dismiss(animated: true, completion: nil)
  }
}
In IconColorController
You will show a collection view and in that collection view you will show your colors and when choosing a color you will also pass it using Notifications.
class IconColorController: UIViewController {
  let collectionView: UICollectionView = {
    // Construct a collectionView
  }()
  let cellId = "ColorCell"
  let colorsTable: [Int: [UIColor]] = []//Colors

  override func viewDidLoad() {
    super.viewDidLoad()
    setupCollectionView()
  }

  fileprivate func setupCollectionView() {
    // collectionView AutoLayout...
    // setup collectionView FlawLayout properties..
    self.collectionView.dataSource = self
    self.collectionView.delegate = self
    self.collectionView.register(IconChooseColorCell.self, forCellWithReuseIdentifier: cellId)
  }
}

extension IconColorController: UICollectionViewDelegate, UICollectionViewDataSource, UICollectionViewDelegateFlowLayout {
  //..

  func collectionView(_ collectionView: UICollectionView, didSelectItemAt indexPath: IndexPath) {
    guard let colors = colorsTable[indexPath.row] else { fatalError("Colors table erro") }
    let colorDataDict:[String: [UIColor]] = ["colorDict": [colors[0], colors[1]]]
    NotificationCenter.default.post(name: NSNotification.Name(rawValue: "colorRefersh"), object: nil, userInfo: colorDataDict)
  }

  //..
}
Also, don’t forget to create a collectionViewCell.
class IconChooseColorCell: UICollectionViewCell {
  let view: UIImageView = {
    let cv = UIImageView()
    cv.translatesAutoresizingMaskIntoConstraints = false
    return cv
  }()

  override init(frame: CGRect) {
    super.init(frame: frame)
    setupView()
  }

  required init?(coder aDecoder: NSCoder) {
    fatalError("init(coder:) has not been implemented")
  }

  fileprivate func setupView() {
    self.addSubview(view)
    NSLayoutConstraint.activate([
      view.topAnchor.constraint(equalTo: self.topAnchor),
      view.bottomAnchor.constraint(equalTo: self.bottomAnchor),
      view.leftAnchor.constraint(equalTo: self.leftAnchor),
      view.rightAnchor.constraint(equalTo: self.rightAnchor),
      ])
  }
}
In IconGlyphController
First, you will need to add the images to your project. I downloaded a free pack from FlatIcon and then dragged them and added them to the project folder.
Following the same pattern as of selecting an icon and selecting a background color. In choosing a glyph for your list you will be passing it by Notifications.
class IconGlyphController: UIViewController {
  let collectionView: UICollectionView = {
    // Construct a collectionView
  }()
  let cellId = "ColorCell"
  let iconsNames = [] //Icon Names

  override func viewDidLoad() {
    super.viewDidLoad()
    setupCollectionView()
  }

  fileprivate func setupCollectionView() {
    // collectionView AutoLayout...
    // setup collectionView FlawLayout properties..
    self.collectionView.dataSource = self
    self.collectionView.delegate = self
    self.collectionView.register(IconChooseColorCell.self, forCellWithReuseIdentifier: cellId)
  }
}

extension IconGlyphController: UICollectionViewDelegate, UICollectionViewDataSource, UICollectionViewDelegateFlowLayout {
  //..

  func collectionView(_ collectionView: UICollectionView, cellForItemAt indexPath: IndexPath) -> UICollectionViewCell {
    let cell = collectionView.dequeueReusableCell(withReuseIdentifier: cellId, for: indexPath) as! IconChooseColorCell
    DispatchQueue.main.async {
      cell.view.image = UIImage(named: self.iconsNames[indexPath.row])
      cell.view.image = cell.view.image?.withRenderingMode(.alwaysTemplate)
      cell.view.tintColor = #colorLiteral(red: 0.1764705926, green: 0.4980392158, blue: 0.7568627596, alpha: 1)
    }
    return cell
  }

  func collectionView(_ collectionView: UICollectionView, didSelectItemAt indexPath: IndexPath) {
    let selectedIcon = UIImage(named: iconsNames[indexPath.row])!
    let iconDict: [String: UIImage] = ["iconDict": selectedIcon]
    NotificationCenter.default.post(name: Notification.Name(rawValue: "iconRefresh"), object: nil, userInfo: iconDict)
  }

  //..
}
In ListIconController
You will need to unwrap the information coming from the notification observers.
class ListIconController: UIViewController {
  //..
  @objc private func handleChangeColor(notification:  Notification) {
    guard let colorDict = notification.userInfo else { return }
    guard let colors = colorDict["colorDict"] as? [UIColor] else { return }
    firstColorData = colors[0].encode()
    secondColorData = colors[1].encode()
    iconView.backgroundImage.image = nil
    setIconGradient(colorOne: colors[0], colorTwo: colors[1])
  }

  @objc private func handleChangeIcon(notification: Notification) {
    guard let iconDict = notification.userInfo else { return }
    guard let image = iconDict["iconDict"] as? UIImage else { return }
    iconView.backgroundImage.image = nil
    iconView.image.image = image
    iconView.image.image = iconView.image.image?.withRenderingMode(.alwaysTemplate)
    iconView.image.tintColor = .white
    iconView.contentMode = .scaleAspectFit
  }

  @objc private func handleChangeImage(notification: Notification) {
    guard let iconDict = notification.userInfo else { return }
    guard let image = iconDict["iconDict"] as? UIImage else { return }
    isImage = true
    iconView.image.image = nil
    iconView.backgroundImage.image = image
  }
}
You will need to handle changing views based on the segmented controller.
class ListIconController: UIViewController {
  @IBOutlet weak var chooseColorView: UIView!
  @IBOutlet weak var chooseOtherView: UIView!
  @IBOutlet weak var chooseGlyphView: UIView!

  fileprivate func setupViews() {
    switchViews(firstView: 1.0, secondView: 0.0, thirdView: 0.0)
  }

  private func switchViews(firstView: CGFloat, secondView: CGFloat, thirdView: CGFloat) {
    chooseColorView.alpha = firstView
    chooseOtherView.alpha = thirdView
    chooseGlyphView.alpha = secondView
  }

  @IBAction func handleSelectView(_ sender: UISegmentedControl) {
    switch sender.selectedSegmentIndex {
    case 0:
      switchViews(firstView: 1.0, secondView: 0.0, thirdView: 0.0)
      break
    case 1:
      switchViews(firstView: 0.0, secondView: 1.0, thirdView: 0.0)
      break
    case 2:
      switchViews(firstView: 0.0, secondView: 0.0, thirdView: 1.0)
      break
    default:
      break
    }
  }
}
And, of course, saving the data to CoreData and rendering the UIView to an image. And maybe check if there’s an already saved image you will load it instead of a new one.
  @IBAction func handleDone(_ sender: Any) {
    let renderer = UIGraphicsImageRenderer(size: iconView.bounds.size)
    let image = renderer.image { ctx in
      iconView.drawHierarchy(in: iconView.bounds, afterScreenUpdates: true)
    }
    let finalIconDict: [String: UIImage] = ["finalIcon": image]
    NotificationCenter.default.post(name: NSNotification.Name("finalIcon"), object: nil, userInfo: finalIconDict)
    if list != nil {
      let context = CoreDataManager.shared.persistentContainer.viewContext
      let imageData = image.jpegData(compressionQuality: 0.8)
      list?.setValue(imageData, forKey: "imageData")
      do {
        try context.save()
        navigationController?.popViewController(animated: true)
      } catch let err {
        print(err)
      }
    } else {
      navigationController?.popViewController(animated: true)
    }
  }
Also, you will need to create an icon view that will have a gradient background.
@IBDesignable
class IconView: UIView {

  @IBInspectable
  var topColor: UIColor = .clear {
    didSet {
      updateViews()
    }
  }

  @IBInspectable
  var bottomColor: UIColor = .clear {
    didSet {
      updateViews()
    }
  }

  let image: UIImageView = {
    let im = UIImageView()
    im.contentMode = .scaleAspectFit
    im.translatesAutoresizingMaskIntoConstraints = false
    return im
  }()

  let backgroundImage: UIImageView = {
    let im = UIImageView()
    im.contentMode = .scaleAspectFill
    im.translatesAutoresizingMaskIntoConstraints = false
    return im
  }()

  override class var layerClass: AnyClass {
    get {
      return CAGradientLayer.self
    }
  }

  private func updateViews() {
    let layer = self.layer as! CAGradientLayer
    layer.colors = [topColor.cgColor, bottomColor.cgColor]
    setupImageView()
    setupBackgroundImage()
  }

  private func setupImageView() {
    self.addSubview(image)
    NSLayoutConstraint.activate([
      image.centerXAnchor.constraint(equalTo: self.centerXAnchor),
      image.centerYAnchor.constraint(equalTo: self.centerYAnchor),
      image.heightAnchor.constraint(equalToConstant: 70),
      image.widthAnchor.constraint(equalToConstant: 70)
      ])
  }

  private func setupBackgroundImage() {
    self.addSubview(backgroundImage)
    NSLayoutConstraint.activate([
      backgroundImage.topAnchor.constraint(equalTo: self.topAnchor),
      backgroundImage.bottomAnchor.constraint(equalTo: self.bottomAnchor),
      backgroundImage.leftAnchor.constraint(equalTo: self.leftAnchor),
      backgroundImage.rightAnchor.constraint(equalTo: self.rightAnchor)
      ])
  }
}
Update your Extension file to match the following:
public extension UIColor {
  convenience init(r: CGFloat, g: CGFloat, b: CGFloat) {
    self.init(red: r/255, green: g/255, blue: b/255, alpha: 1)
  }
  static var customBackgroundColor: UIColor = {
    return UIColor(r: 239, g: 239, b: 244)
  }()
  convenience init(hexString: String, alpha: CGFloat = 1) {
    assert(hexString[hexString.startIndex] == "#", "Expected hex string of format #RRGGBB")
    let scanner = Scanner(string: hexString)
    scanner.scanLocation = 1  // skip #
    var rgb: UInt32 = 0
    scanner.scanHexInt32(&rgb)
    self.init(
      red:   CGFloat((rgb & 0xFF0000) >> 16)/255.0,
      green: CGFloat((rgb &   0xFF00) >>  8)/255.0,
      blue:  CGFloat((rgb &     0xFF)      )/255.0,
      alpha: alpha)
  }
  func toHexString() -> String {
    var r:CGFloat = 0
    var g:CGFloat = 0
    var b:CGFloat = 0
    var a:CGFloat = 0
    getRed(&r, green: &g, blue: &b, alpha: &a)
    let rgb:Int = (Int)(r*255)<<16 | (Int)(g*255)<<8 | (Int)(b*255)<<0
    return String(format:"#%06x", rgb)
  }
  class func color(data:Data) -> UIColor? {
    return try? NSKeyedUnarchiver.unarchiveTopLevelObjectWithData(data) as? UIColor
  }
  func encode() -> Data? {
    return try? NSKeyedArchiver.archivedData(withRootObject: self, requiringSecureCoding: false)
  }
  static func hexStringToUIColor (hex:String) -> UIColor {
    var cString:String = hex.trimmingCharacters(in: .whitespacesAndNewlines).uppercased()
    if (cString.hasPrefix("#")) {
      cString.remove(at: cString.startIndex)
    }
    if ((cString.count) != 6) {
      return UIColor.gray
    }
    var rgbValue:UInt32 = 0
    Scanner(string: cString).scanHexInt32(&rgbValue)
    return UIColor(
      red: CGFloat((rgbValue & 0xFF0000) >> 16) / 255.0,
      green: CGFloat((rgbValue & 0x00FF00) >> 8) / 255.0,
      blue: CGFloat(rgbValue & 0x0000FF) / 255.0,
      alpha: CGFloat(1.0)
    )
  }
}

extension UIView {
  func setGradientBackgroundColor(colorOne: UIColor, colorTow: UIColor) {
    let gradientLayer = CAGradientLayer()
    gradientLayer.frame = bounds
    gradientLayer.colors = [colorOne.cgColor, colorTow.cgColor]
    gradientLayer.locations = [0.0, 1.0]
    gradientLayer.endPoint = CGPoint(x: 1.0, y: 1.0)
    gradientLayer.startPoint = CGPoint(x: 0.0, y: 0.0)
    layer.insertSublayer(gradientLayer, at: 0)
  }
  func makeRoundedCorners() {
    self.layer.cornerRadius = (self.frame.width / 2)
    self.layer.masksToBounds = true
  }
  func makeRoundedCorners(by value: Int) {
    self.layer.cornerRadius = CGFloat(value)
    self.layer.masksToBounds = true
  }
}
// Autolayout helpers...
If you are interested in knowing how I saved UIColor with CoreData. I used an approach similar to what I used in my previous article — Save UIColor With UserDefaults in Swift 5.
Main ViewController
Finally, go to ViewController.swift and you will need to update a couple of things.
In both viewDidLoad and viewWillAppear methods, you will need to add the following line in order to fetch the list objects from CoreData.
**self**.lists = CoreDataManager.shared.fetchLists()
You will also need to confirm to the CreateListControllerDelegate and implement the didAddList() function.
extension ViewController: CreateListControllerDelegate {
  func didAddList(list: List) {
    self.collectionView.performBatchUpdates({
      let indexPath = IndexPath(row: lists.count - 1, section: 0)
      self.collectionView.insertItems(at: [indexPath])
    }, completion: nil)
  }
}
The final result and a Conclusion
Finally, after a lot of work — for me at least. I managed to achieve my goal of making an icon creating system. It really comes very handily in a lot of application and it gives the user great user experience.
 The end result
I’m really happy with my end result maybe there was an easier way of doing the same task. So if you have any feedback please add a comment below. I do really appreciate it.
Also, remember If you aren’t a designer you can also buy some great iOS App Templates and if you are more interested in React Native App Templates you can buy them from here they have a really great collection.
Improvements
There’s a big room for improvements like for example improving or refining the code or adding new features like:
Editing a list
Deleting a list
Therefore, please feel free to pull the repo from GitHub and add when you are finished adding features to the project submit a PR. PRs are very welcome.
GitHub Project
HassanElDesouky/AppleShortcuts You can’t perform that action at this time. You signed in with another tab or window. You signed out in another tab or…github.com
And special thanks to Mohammed ElNaggar for helping out!
I think this article will help a lot of people. Therefore, I’m making it free. But please if you can tip me I will be so grateful. I’m saving to get an Apple Developer paid account so I can start uploading apps to the AppStore and tackle with early betas and a lot of paid only technologies like CloudKit.