

CollectionViews are critical to have in almost any of your iOS applications and to make your application stands out you should create a good design. Apple’s Shortcuts app Library screen really shows off a great user interface design and still very simplistic and authentic.
Let’s start with creating a new project; I will name it ShortcutsCollectionView. Make sure that you have chosen Swift as your Language, save it somewhere on your mac and let’s start coding!
We are making it entirely in code, and we won’t be using the storyboard. So, First delete the Main.storyboard file and then remove it again from the Deployment Info in your target. You should have something looking like this:

The second thing that we would have to do is to set up the window. So, in your AppDelegate.swift file you add those couple of lines of code to your didFinishLaunchingWithOptions method.
func application(_ application: UIApplication, didFinishLaunchingWithOptions launchOptions: [UIApplication.LaunchOptionsKey: Any]?) -> Bool {
// Override point for customization after application launch.
//New code starts from here
window = UIWindow(frame: UIScreen.main.bounds)
window?.makeKeyAndVisible()


let mainVC = ViewController()
window?.rootViewController = mainVC


return true
}
Now, if you run the app it will show you a black screen, and that’s amazing! So let’s build our collectionView.
I will create the collectionViewCell class first, so let’s create it! Start with creating a new Swift file, name it MainCollectionViewCell.swift, import UIKit instead of Foundation and make a class and call it MainCollectionViewCell and of course make it conform to the UICollectionViewCell class. override your init method and add required init method. Then we will create our UI elements, we need an edit button, an icon image and a title for the cell. Then we will create a setupCell method to help organize our code better, a cellRandomBackgroundColors method, gradientBackgroundColor method, roundCorner method, and a setCellShadow method.
Random gradient background.
Now, let’s talk about how I created the randomly generated background gradients. First, I took a screenshot from Apple’s Shortcuts app to help me pick the colors that I’ll be working with since I’m aiming for creating a somewhat identical UI.

Next, I created a function that doesn't take any parameters and returns a UIColor array. Then, I created a UIColor array for every two colors since that those two colors will be used to create the gradient. Next, I created a HashTable or a Dictionary that will have a key of type integer and values of type UIColor array. Finally, I returned a random element value from that dictionary.
Now our file should look like this:
//
//  MainCollectionViewCell.swift
//  ShortcutsCollectionView
//
//  Created by Hassan El Desouky on 12/13/18.
//  Copyright © 2018 Hassan El Desouky. All rights reserved.
//

import UIKit

class MainCollectionViewCell: UICollectionViewCell {

    override init(frame: CGRect) {
        super.init(frame: frame)
        setupCell()
    }
    required init?(coder aDecoder: NSCoder) {
        fatalError("init(coder:) has not been implemented")
    }
    // MARK: UI
    let iconImageView: UIImageView = {
        let imageView = UIImageView()
        imageView.image = UIImage(named: "Folder")
        imageView.contentMode = .scaleAspectFit
        return imageView
    }()
    let listNameLabel: UILabel = {
        let label = UILabel()
        label.text = "List"
        label.textColor = UIColor.white
        label.font = UIFont.boldSystemFont(ofSize: 19)
        label.textAlignment = .left
        return label
    }()
    let editButton: UIButton = {
        let button = UIButton(type: .custom) as UIButton
        button.setImage(UIImage(named: "Edit"), for: UIControl.State.normal)
        return button
    }()

    // MARK: Setup Cell
    fileprivate func setupCell() {
        roundCorner()
        gradientBackgroundColor()
        setCellShadow()
        self.addSubview(iconImageView)
        self.addSubview(listNameLabel)
        self.addSubview(editButton)
        iconImageView.anchor(top: safeTopAnchor, left: safeLeftAnchor, bottom: nil, right: nil, paddingTop: 8, paddingLeft: 8, paddingBottom: 0, paddingRight: 0, width: 36, height: 36)
        listNameLabel.anchor(top: iconImageView.bottomAnchor, left: safeLeftAnchor, bottom: nil, right: nil, paddingTop: 18, paddingLeft: 8, paddingBottom: 0, paddingRight: 0)
        editButton.anchor(top: safeTopAnchor, left: nil, bottom: nil, right: safeRightAnchor, paddingTop: 8, paddingLeft: 0, paddingBottom: 0, paddingRight: 8, width: 36, height: 36)

    }

    // MARK: Methods
    func setCellShadow() {
        self.layer.shadowColor = UIColor.black.cgColor
        self.layer.shadowOffset = CGSize(width: 0, height: 1)
        self.layer.shadowOpacity = 0.2
        self.layer.shadowRadius = 1.0
        self.layer.masksToBounds = false
        self.layer.cornerRadius = 3
        self.clipsToBounds = false
    }
    func cellRandomBackgroundColors() -> [UIColor] {
        //Colors
        let red = [#colorLiteral(red: 0.9654200673, green: 0.1590853035, blue: 0.2688751221, alpha: 1),#colorLiteral(red: 0.7559037805, green: 0.1139892414, blue: 0.1577021778, alpha: 1)]
        let orangeRed = [#colorLiteral(red: 0.9338900447, green: 0.4315618277, blue: 0.2564975619, alpha: 1),#colorLiteral(red: 0.8518816233, green: 0.1738803983, blue: 0.01849062555, alpha: 1)]
        let orange = [#colorLiteral(red: 0.9953531623, green: 0.54947716, blue: 0.1281470656, alpha: 1),#colorLiteral(red: 0.9409626126, green: 0.7209432721, blue: 0.1315650344, alpha: 1)]
        let yellow = [#colorLiteral(red: 0.9409626126, green: 0.7209432721, blue: 0.1315650344, alpha: 1),#colorLiteral(red: 0.8931249976, green: 0.5340107679, blue: 0.08877573162, alpha: 1)]
        let green = [#colorLiteral(red: 0.3796315193, green: 0.7958304286, blue: 0.2592983842, alpha: 1),#colorLiteral(red: 0.2060100436, green: 0.6006633639, blue: 0.09944178909, alpha: 1)]
        let greenBlue = [#colorLiteral(red: 0.2761503458, green: 0.824685812, blue: 0.7065336704, alpha: 1),#colorLiteral(red: 0, green: 0.6422213912, blue: 0.568986237, alpha: 1)]
        let kindaBlue = [#colorLiteral(red: 0.2494148612, green: 0.8105323911, blue: 0.8425348401, alpha: 1),#colorLiteral(red: 0, green: 0.6073564887, blue: 0.7661359906, alpha: 1)]
        let skyBlue = [#colorLiteral(red: 0.3045541644, green: 0.6749247313, blue: 0.9517192245, alpha: 1),#colorLiteral(red: 0.008423916064, green: 0.4699558616, blue: 0.882807076, alpha: 1)]
        let blue = [#colorLiteral(red: 0.1774400771, green: 0.466574192, blue: 0.8732826114, alpha: 1),#colorLiteral(red: 0.00491155684, green: 0.287129879, blue: 0.7411141396, alpha: 1)]
        let bluePurple = [#colorLiteral(red: 0.4613699913, green: 0.3118675947, blue: 0.8906354308, alpha: 1),#colorLiteral(red: 0.3018293083, green: 0.1458326578, blue: 0.7334778905, alpha: 1)]
        let purple = [#colorLiteral(red: 0.7080290914, green: 0.3073516488, blue: 0.8653779626, alpha: 1),#colorLiteral(red: 0.5031493902, green: 0.1100070402, blue: 0.6790940762, alpha: 1)]
        let pink = [#colorLiteral(red: 0.9495453238, green: 0.4185881019, blue: 0.6859942079, alpha: 1),#colorLiteral(red: 0.8123683333, green: 0.1657164991, blue: 0.5003474355, alpha: 1)]

        let colorsTable: [Int: [UIColor]] = [0: red, 1: orangeRed, 2: orange, 3: yellow, 4: green, 5: greenBlue, 6: kindaBlue, 7: skyBlue, 8: blue, 9: bluePurple, 10: bluePurple, 11: purple, 12: pink]

        let randomColors = colorsTable.values.randomElement()
        return randomColors!
    }
    func gradientBackgroundColor() {
        let colors = cellRandomBackgroundColors()
        self.contentView.setGradientBackgroundColor(colorOne: colors[0], colorTow: colors[1])
    }
    func roundCorner() {
        self.contentView.layer.cornerRadius = 12.0
        self.contentView.layer.masksToBounds = true
        self.contentView.layer.borderWidth = 1.0
        self.contentView.layer.borderColor = UIColor.clear.cgColor
    }

}
Note: I have created an extension file to help me with the autoLayout and to set the gradient background color.
Now let’s move to our ViewController.swift file. Make it conform to UICollectionViewController and UICollectionViewDelegateFlowLayout. Now if you run your app it will crash, we will solve all of the issues later. But now let’s set up our collectionView and navigationBarController. In the collectionViewLayout method you need to make the screen fits only two cells. So it will be something like this:
**func** collectionView(**_** collectionView: UICollectionView, layout collectionViewLayout: UICollectionViewLayout, sizeForItemAt indexPath: IndexPath) -> CGSize {

   return CGSize(width: (view.frame.width / 2) - 20, height: 110)
}
Now if you run the app it’ll crash, so let’s fix that bug. Open the AppDelegate.swift file and change the method that we wrote earlier to this… because now the ViewController is a collectionView.
    func application(_ application: UIApplication, didFinishLaunchingWithOptions launchOptions: [UIApplication.LaunchOptionsKey: Any]?) -> Bool {
        // Override point for customization after application launch.
        window = UIWindow(frame: UIScreen.main.bounds)
        window?.makeKeyAndVisible()

        let layout = UICollectionViewFlowLayout()
        let mainVC = ViewController(collectionViewLayout: layout)
        window?.rootViewController = UINavigationController(rootViewController: mainVC)

        return true
    }
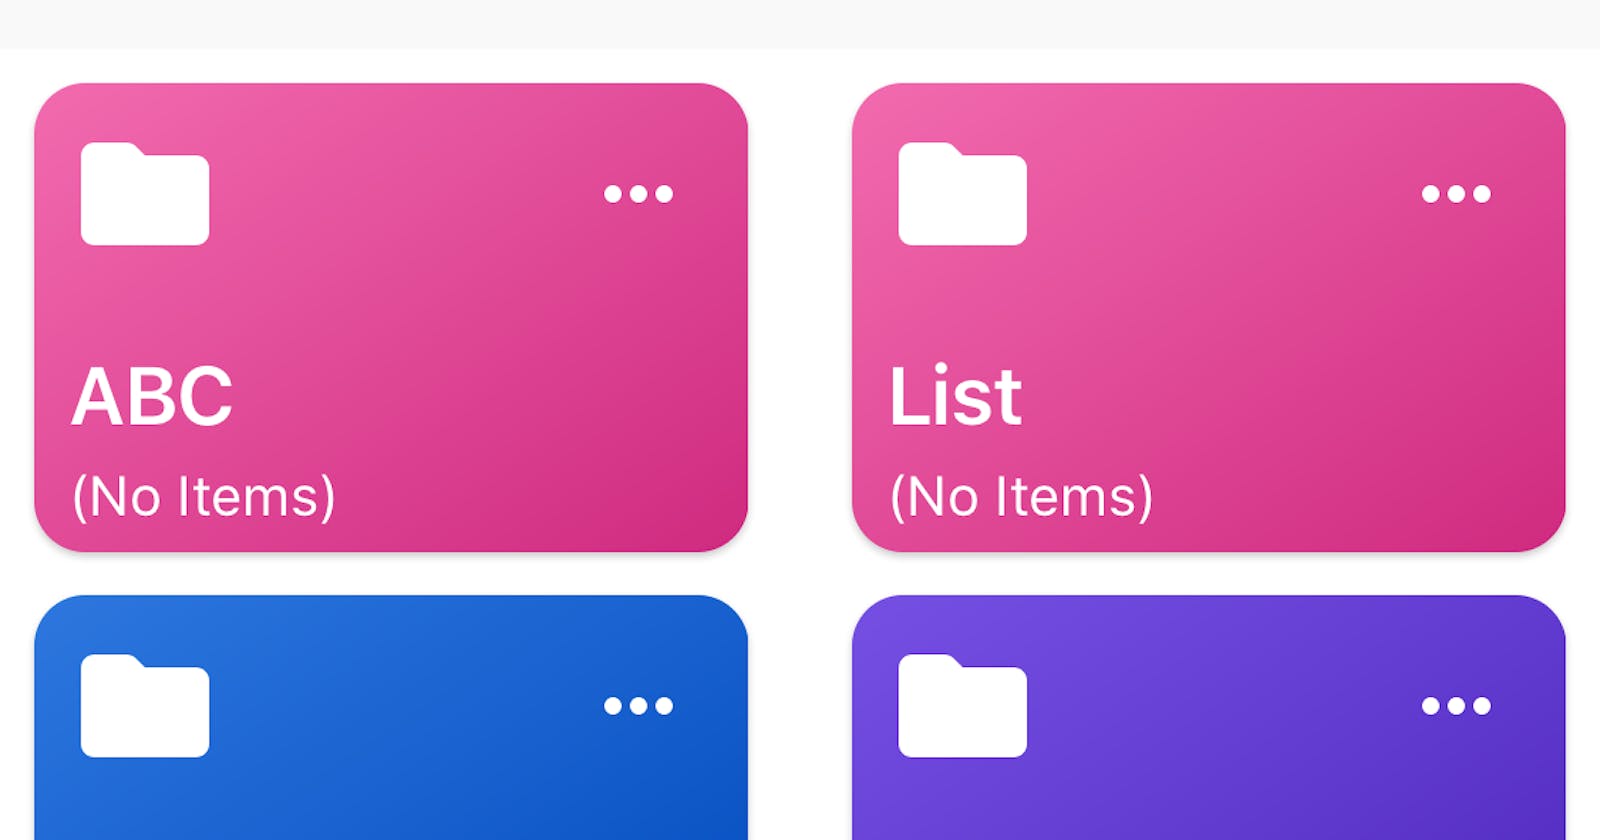
Final results:
If you run the app now, voilà! It has three cells that have different background gradient colors almost like Apple’s Shortcuts App.
If you aren’t a designer you can also buy some great iOS App Templates and if you are more interested in React Native App Templates you can buy them from here they have a really great collection.

Challenge:
Now every time you run the app, the colors will change. What if you want to save the colors, so it will be generated once and not every time you open the app. What will you do?
The full project on GitHub
Here’s a link to the full project on my GitHub account if you wanted to play with the code yourself. HassanElDesouky/ShortcutsCollectionView Contribute to HassanElDesouky/ShortcutsCollectionView development by creating an account on GitHub.github.com
Finally:
I hope you liked my first tutorial, and if you do please don’t forget giving it a clap, and I really would appreciate it if anyone has any advice for me to make my next article better.
Happy coding!